
tea and cookies with houdini - 1 & 2
total duration - 5 hrs 23 mins
The video training includes the hip files
Training level - beginner to intermediate
Download word doc for more videos to help adapt the older training to Houdini 18.5
link
individual parts

taxes as applicable
credit card and paypal
combined

description
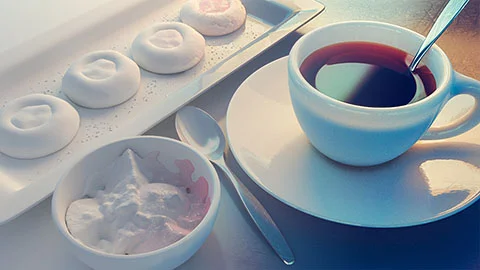
The aim of this commercial training is to take you through the process of creating the "Tea and Cookies" image, all the way from modeling to render and even the final color grading entirely in Houdini from scratch. This should help you gain a better perspective towards using Houdini as your primary tool for creating 3d content.
The training will take you through various aspects of Houdini including, Polygonal Modeling, Procedural modeling, Dynamics, Shader Building, Lighting, Rendering and Color Grading.
The training is split into to parts, each part is available separately. Part 1 will cover the modeling of the entire scene and Part 2 shall deal with the lighting, shading and rendering the final image. Given below are the details regarding the two sections.
part 1 - modeling

Content Details - 9 Video Chapters (with Audio)
Duration - 2 hrs 50 mins
$25
Lesson Plan
Modeling the Jam bowl - Basic Introduction to poly modeling in Houdini
Modeling the spoon - Using attributes and ramps to control poly modeling
Modeling the Cup - procedural modeling of the cup. In 3b we will model the saucer
Modeling the Tea - Extracting the tea liquid surface from the cup geometry
Modeling the Cookie - Painting Attributes and adding displacement using VOPSOP to add details
Copy stamping and Cookies - Understanding the basics of copy stamping to creating copies of the cookie
Modeling the Tray and the Crumbs - Using scatter and voronoi fracture for modeling
Modeling the Jam - Using RBDs and VDB toolset for modeling
part 2 - light, shade and render
Content Details - 11 Video Chapters (with Audio)
Duration - 2 hrs 33 mins
$25
Lesson Plan
Lighting the scene - Adding lights and setting up the camera and the render engine
HDRI - Adding an HDR for reflections and additional information about lights
Material Basics - Understanding the capabilities and limitations of the Mantra Surface Shader
Steel Material - Using the Material Shader builder to create the Steel shader and using textures to control various channels
Plastic Tray - Making a plastic material for the tray. Learning how to use multiple UV channels. Adding bump mapping
Porcelain - Using SSS to create a porcelain shader.
Flooring material - Learn how to mix multiple texture maps to create complex surfaces.
Tea Material - Controlling material properties via Geometry Attributes. Using Absorption to create liquid shader
Jam Material - Creating a shader for the jam. Using Caustics for better lighting
Cookie Shader - Creating complex displacement to make the cookie material
Color Grading - Defining the look of the final render by using the compositing section of Houdini
REQUIREMENTS - It would be preferable to use Houdini 13 as there have been certain changes to the lighting interface in this version. At the least don't use anything below Houdini 12.5. As there as tools that we use for modeling that are not available in the prior versions.